
Our next teardown is the Viture Pro XR Glasses, a set of glasses that’s have been out for about a year. While the display and optics solution are similar to almost all other glasses of this form factor, there are two main differentiation points at a price point very similar to our previous teardowns (<$300):
- Myopia/Diopter Adjustment – The display panel can be physically moved in the headset to change the focal point of the image, essentially removing the need for prescription inserts (up to a -5D range)
- Electrochromic Dimming – Another electronically controllable module which can act as a light blocking layer when switched on (<0.5% light transmission) or a moderate tint module when off (~40% transmission)
Hands down, the above two features put these glasses at the top of the list in this price range. While the Sony OLED microdisplay Viture uses is slightly smaller than their competitors (0.55″ vs. 0.6″ on both Xreal and RayNeo), the FoV difference is relatively marginal – the color and brightness are more than enough for indoor use, and with the electrochromic dimming module on, the contrast is great even in bright outdoor environments.
One nice aspect of the electrochromic dimming is that these display glasses are bordering much more on ‘true AR’ glasses than the static tint competition – I can actually turn off the display and the electrochromic film, and see into the world… something that the competitors in this price bracket really cannot do.
There’s a lot more to say, but most of it is covered in the video below – fair warning, this is a bit longer one at almost 30min long… sorry, there was lots to cover this time!
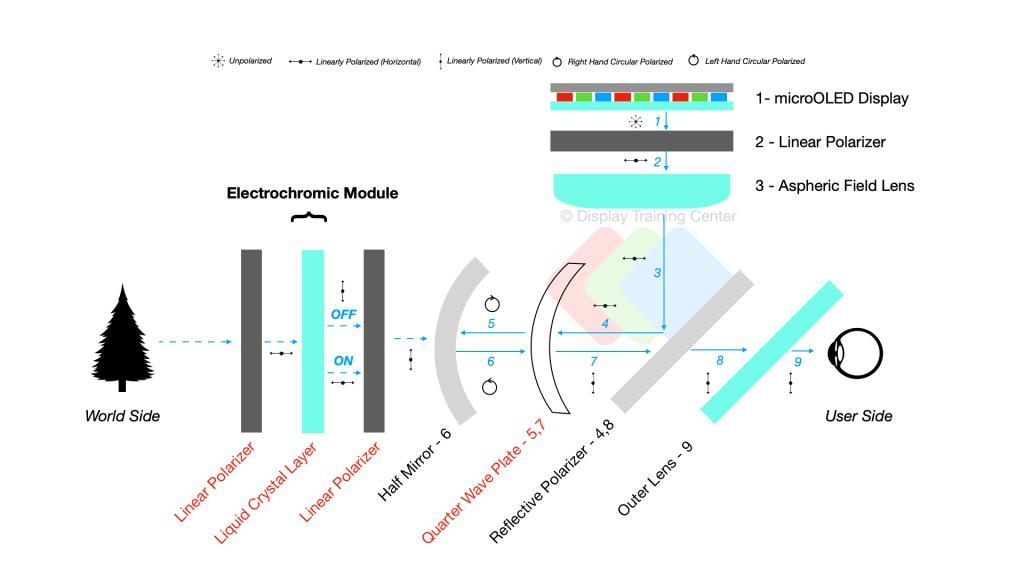
From an optics perspective, Viture has also done something clever – instead of laminating a quarter wave plate (QWP) to both the linear polarizer on the display and the reflective polarizer on the outer lens, they only use one QWP on the half mirror lens.
I’ve updated the polarization diagram below with the changes in film location marked in red, but this doesn’t show the QWP that was removed between locations (2) and (3), as well as (4) and (5).
Now that we have a few devices well characterized, it’s time to take a look at the displays in a little more depth – stay tuned for some spectral analysis of each of the displays used and some surprising finds on the budget models!

Leave a comment