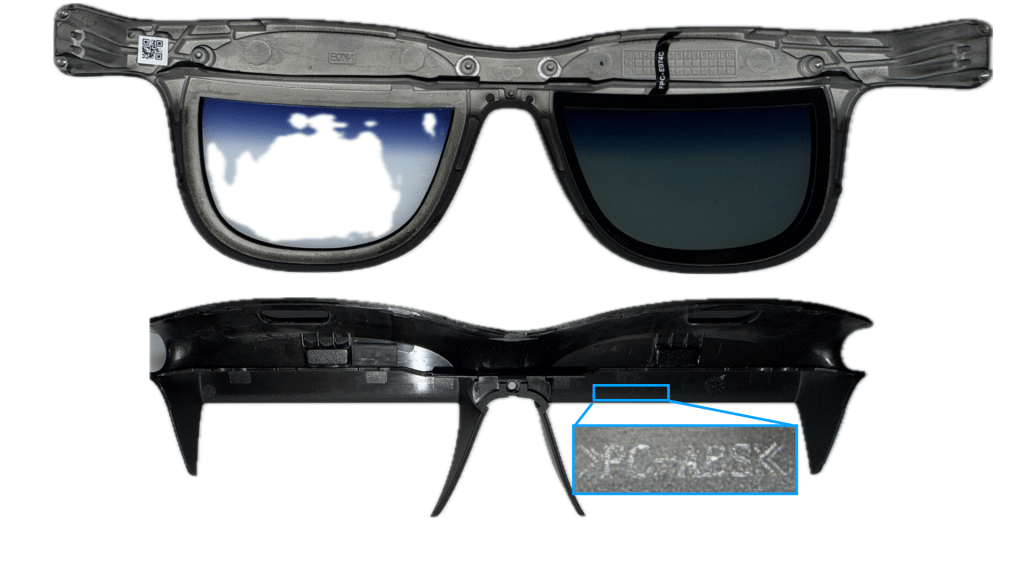
We’ll start this tear-down with the outer face-plate which houses two front lenses, likely polycarbonate with some graded tinting towards the brow. The plate itself seems to be the same AZ91D magnesium alloy that the outer halves of the temple are made of, but the markings are not easily found anywhere on the piece. The inner portion of the glasses is a plastic piece, seemingly of a PC-ABS blend though even this was very poorly marked – I will give Viture overall low marks for lacking these key manufacturing marks on their components whereas RayNeo and Xreal seem to find spots on the limited real estate just fine…
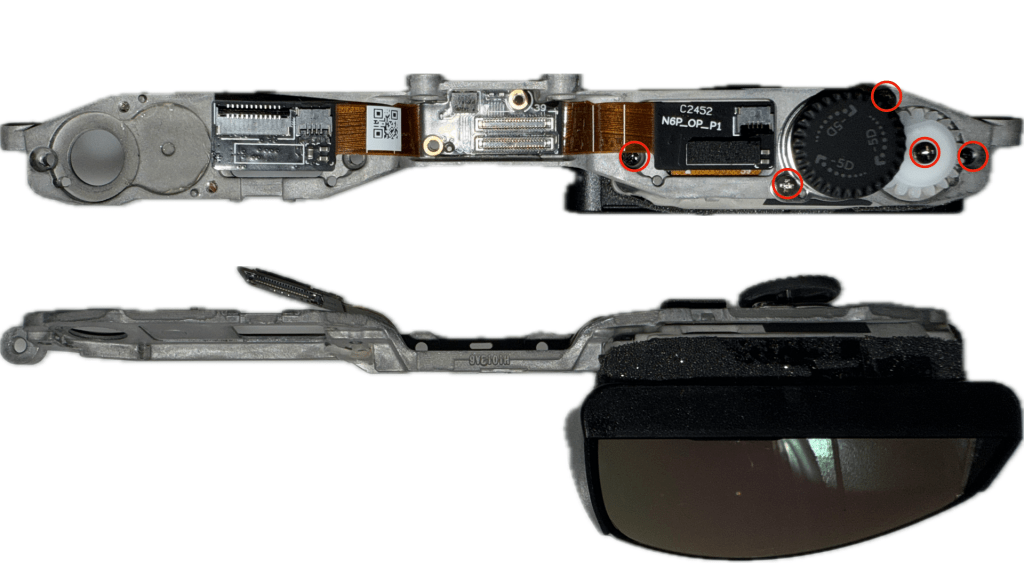
As we move on to the optical modules and central frame, we find a single PCB which houses the connectors for the left and right temple flexes, as well as the separate 2x optical modules (OMs) mounted to the magnesium alloy frame using 5x Phillips screws marked in red above. It’s great to see this inner metallic component as the main frame – while surely more expensive than an injection molded plastic, it allows for the significant heat that is generated by the displays to be removed much more effectively during operation.

The central board is a rigid flex board housing primarily power and data connectors, but there is also an inertial measurement unit (IMU) on the central rigid board – some quick searching shows this to likely be a TDK ICM-42688-P 6-axis IMU, which allows for the 3DoF head tracking via the SpaceWalker app when connected to a device with a capable-enough processor. It’s great to see this already on the bill of materials (BoM) for these glasses so that when much more powerful onboard processing becomes standard for Viture, native 3DoF (and possibly 6DoF) support is going to follow.

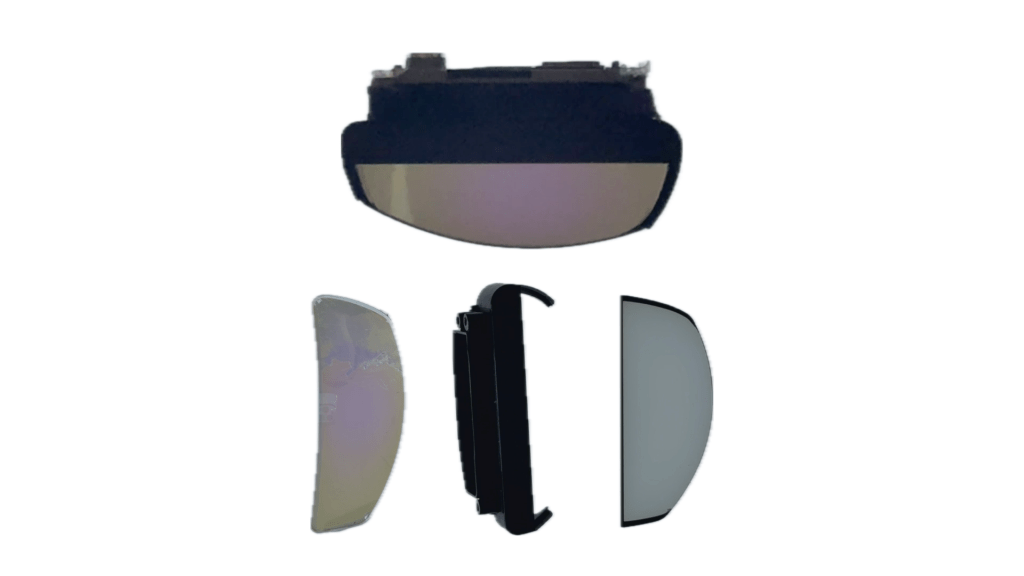

Next, we can break down the OM into the display module and the lens module. Starting with the display module, we see the diopter adjustment mechanism which is a linear screw and two guide-posts that let the display module travel in the Z-direction internal to the optical module. There’s also the flex cable extender from the display panel, to another flex cable which leads to the connector that mates to the central PCB we just looked at – it’s interesting that there would be a midpoint connector here instead of just a long flex from the display, but maybe that allows for less customization of the OLED microdisplay module that Viture purchases from Sony, and lowers the cost overall relative to adding this secondary connector. The detailed display, lens and electrochromic modules were already discussed in the video here, but for those interested the display module is the Sony ECX348E 0.55″ OLED microdisplay.

Next we can look at the right temple which houses the proprietary magnetic pogo-pin connector for data and power, as well as the main logic board. It’s great to see so much thermal interface material around the logic board on this side – while the outer shell is metal, it’s not incredibly useful from a heat dissipation perspective unless there’s a material to transfer that heat to the stem… That’s what Viture did here with all of the multilayer graphite adhesive pads and it will make for a much more comfortable experience long-term as the heat will not be transferred to the inner side against the user’s head.

After removing the thermal shielding, what’s left is an incredibly long rigid-flex PCB that spans all the way from the connector for the power & data module, to the connector that feeds into the central PCB.

The main board houses multiple critical components, but two to call out are the microcontroller – an STM32L452RE – and the display driver (DDIC), the Lontium LT7911UXC we also saw used in the RayNeo Air 3S.

The remaining two components in the right temple are the power/data connector and the right speaker module which connects to the main board via a ZIF connector. There’s not too much more to say about these components, but one surprising thing is the lack of water ingress indicators anywhere so far… The proprietary power connector is not exactly the most well-sealed component against the frame, unlike many of the other brands’ USB-C connector ports which typically have a gasket surrounding them, and so it’s much more likely we would see some moisture damage in the unit if for example your sweat falls into these crevasses – it may be that Viture would honor a return & replacement due to this type of corrosion issues, but that wasn’t tested for explicitly.

To finish the right temple, we’ve removed all the thermal interface materials off both sides of the temple frame leaving behind just the plastic inner-side of the temple (top) and the magnesium alloy outer-side (bottom). While the magnesium alloy is clearly marked from the die cast tooling, the inner plastic piece material information is nowhere to be found – based purely on feel and perceived stiffness, it’s likely to be the same PC-ABS that the inner portion of the bridge is made of, but there is not a way to confirm.

As we move to the left temple, we have dramatically less components to take a look at – primarily just the left logic board and the left speaker module. It does seem that there is some room towards the rear of the temple for some additional components (at the sacrifice of additional weight) in future designs, and I can imagine this and the proprietary pogo pin connector would be great places to swap for some rechargeable batteries in the future.
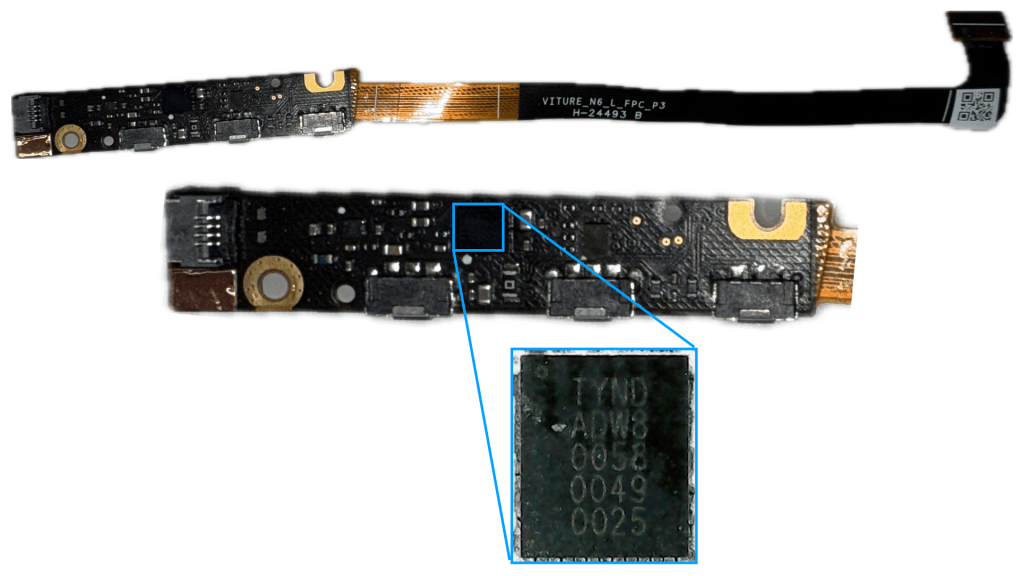
The left logic board is a similar rigid flex that provides the connector all the way to the central logic board, and houses the three main input buttons controlling the glasses display, electrochromic dimming & audio functionality. There are quite a few components here, but the only IC of note is the audio driver IC marked here in blue – I actually can’t find a good source to confirm the manufacturer, so if anyone knows how to decode these please let me know!

I did want to take a quick moment to also look at the hinge design here – it’s interesting that Viture decided to make the hinges in 2-pieces with the gap in between housing the flex cables coming from the temples. As far as I can see, there’s no strong motivation to do so since you don’t necessarily gain any strain relief for the flex, but you do suffer from a cost & complexity penalty as now you have 2x as many hinge components and additional assembly labor… maybe someone else has a better idea if there’s a benefit to this 2-part design.
That wraps up Viture’s optical analysis and full teardown – while I had hoped to take a bit of a break from display glasses and focus on some older optics and true AR glasses, I think it’s only fair I also take a look at another strong competitor in this space: Rokid.

Leave a comment